In recent years, Windows has evolved significantly by enhancing its quick access tool and adding new features, but it has faced its share of challenges. Previously, the taskbar regrouping feature was removed from Windows PCs, but it has made a return in the latest Windows 11 23H2 update.
A specific setting is now available that allows you to separate taskbar icons on Windows 11. With this feature enabled, all open applications will be individually displayed on the taskbar, making it easier to switch between them. This guide will show you multiple methods to ungroup taskbar icons on Windows 11.
Methods to Separate Taskbar Icons on Windows 11
Below, we have outlined four different methods to ungroup taskbar icons on a Windows 11 PC. You can choose any of these methods to achieve the desired outcome.
1. Separate Taskbar Icons via Settings App
The taskbar icon separation feature has returned with the 23H2 update for Windows 11, and you can configure this setting through the Windows Settings app. Follow these steps to ungroup taskbar icons:
- Press Windows + I keys simultaneously on your keyboard to open the Settings app.
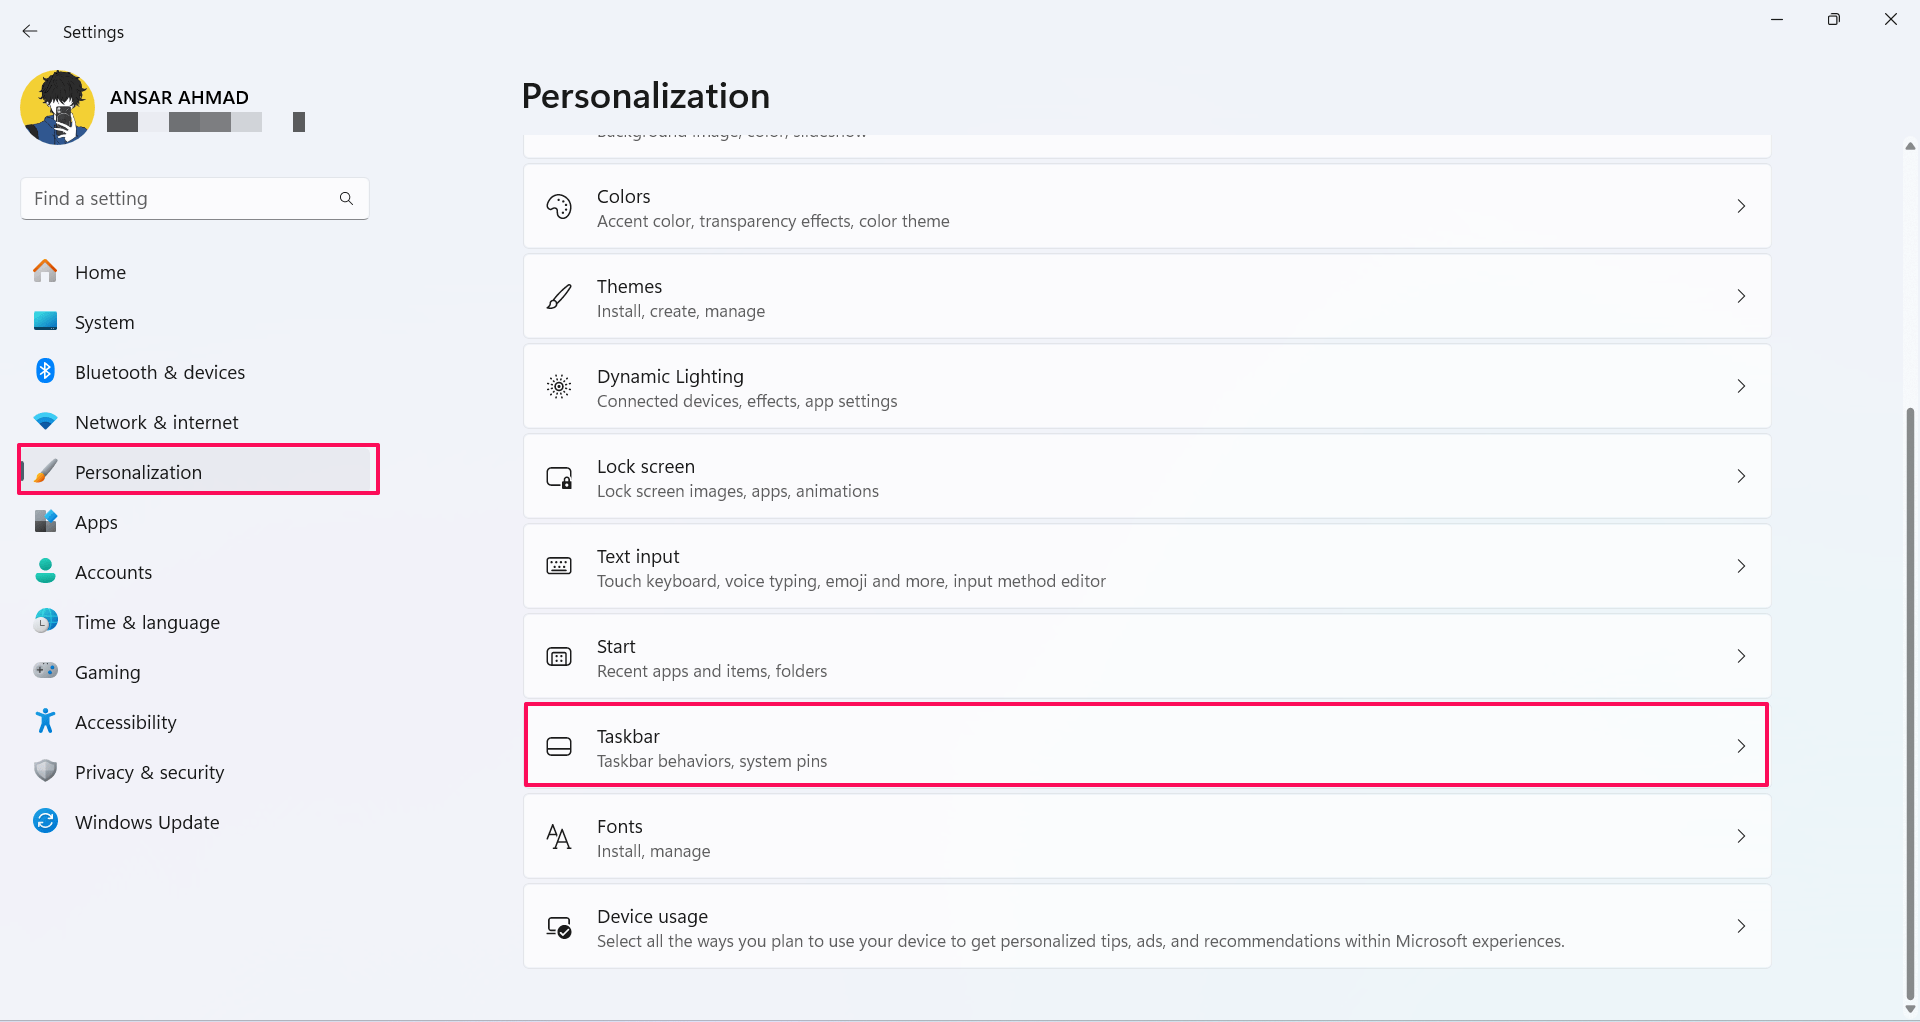
- Go to the Personalization tab and select Taskbar.

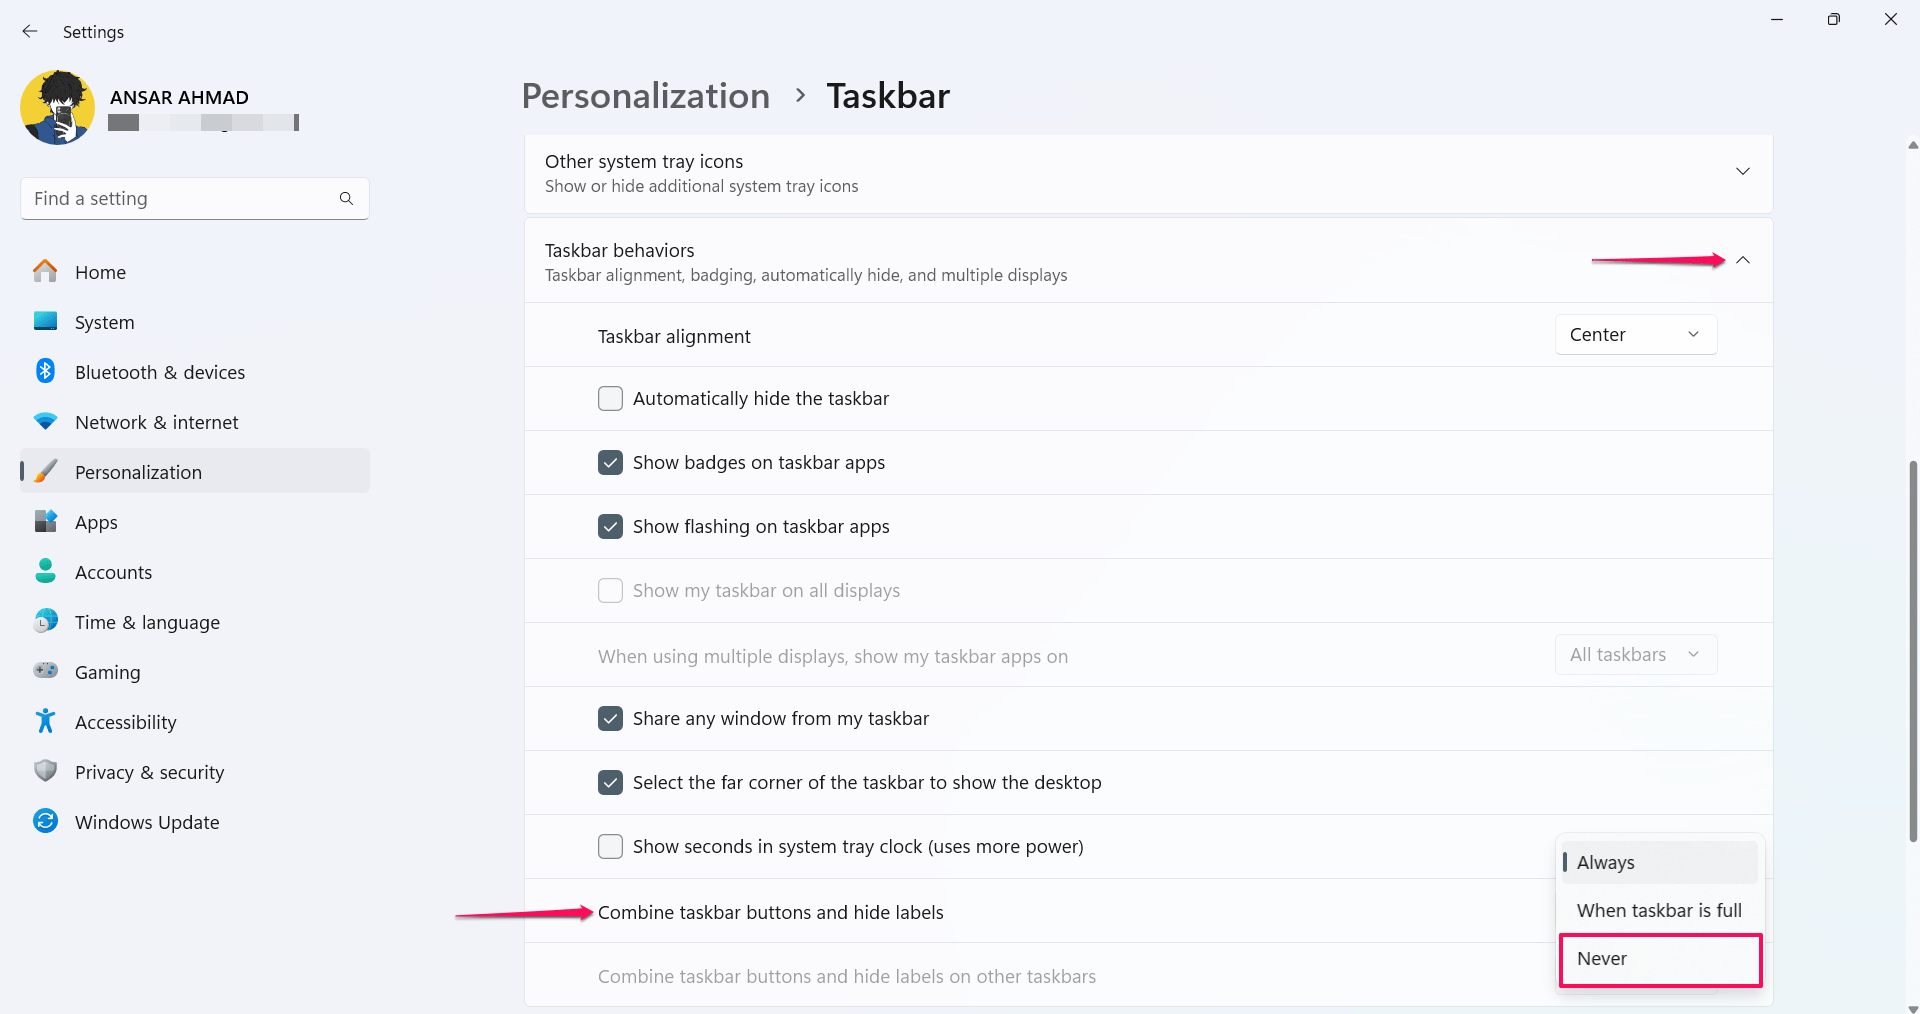
- Scroll down and click on Taskbar behaviors.
- In the Taskbar behaviors menu, locate the “Combine taskbar buttons and hide labels” setting.
- Click the drop-down menu next to it and select “Never”.

You may now see that the taskbar icons are expanded and ungrouped. Note that this setting change only applies to the primary display device.
If you wish to apply it to additional displays, go to the taskbar buttons section and find the “Combine taskbar buttons and hide labels on other taskbars” option. Click the drop-down menu and choose “Never” from the options.
2. Separate Taskbar Icons Using Windows Registry
You can also ungroup taskbar icons directly through the Windows Registry Editor. Here’s how:
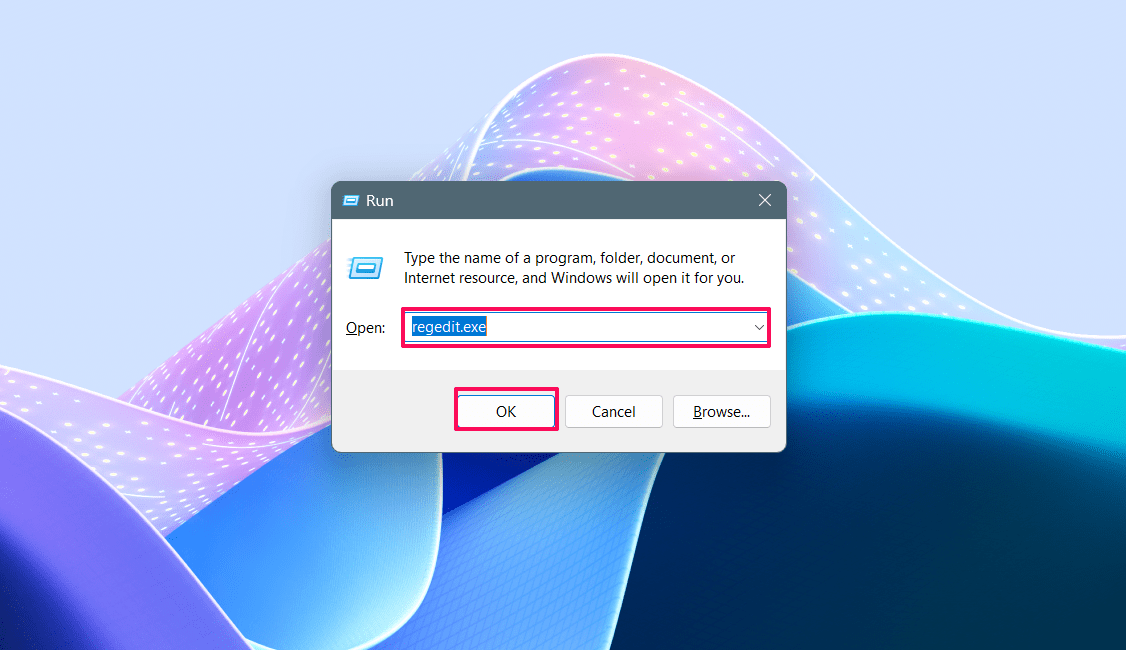
- Press Windows + R keys simultaneously on your keyboard to open the Run dialog box.
- Type regedit.exe in the field, and click OK to launch the Registry Editor.

- In the User Account Control (UAC) prompt, click Yes to proceed.
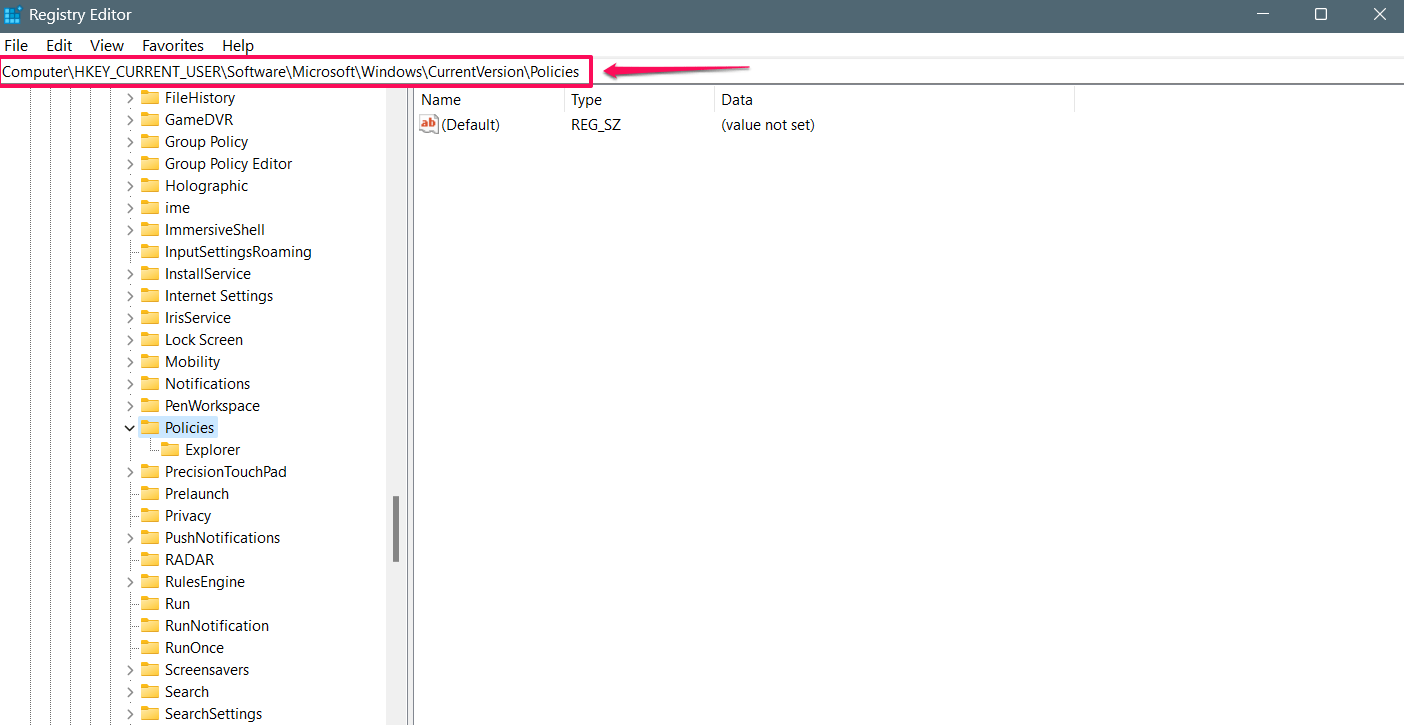
- In the top address bar, paste the following path or navigate manually:
HKEY_CURRENT_USERSOFTWAREMicrosoftWindowsCurrentVersionPolicies
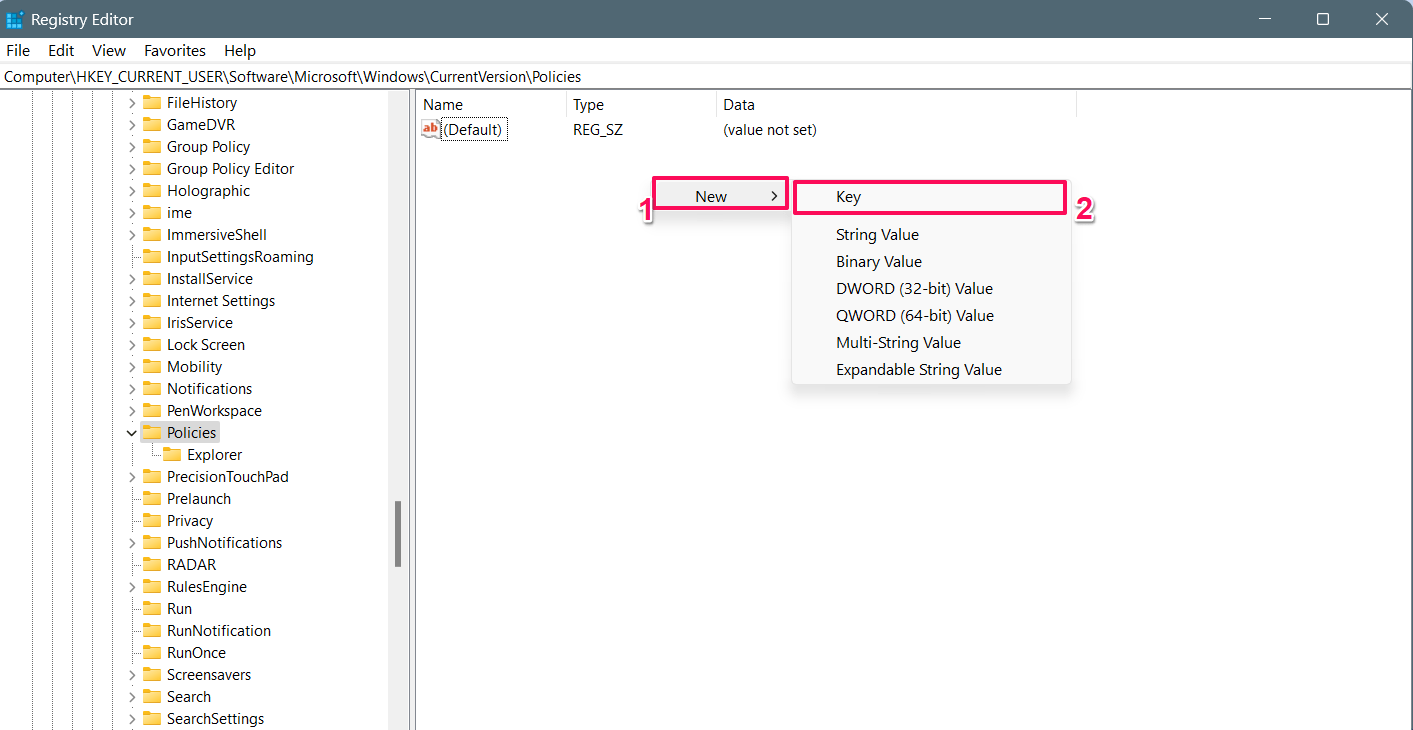
- Under the Policies folder, right-click on the screen, choose New >, and then select Key.

- Name the new key Explorer by double-clicking on it. If the Explorer key already exists, you can skip this step.
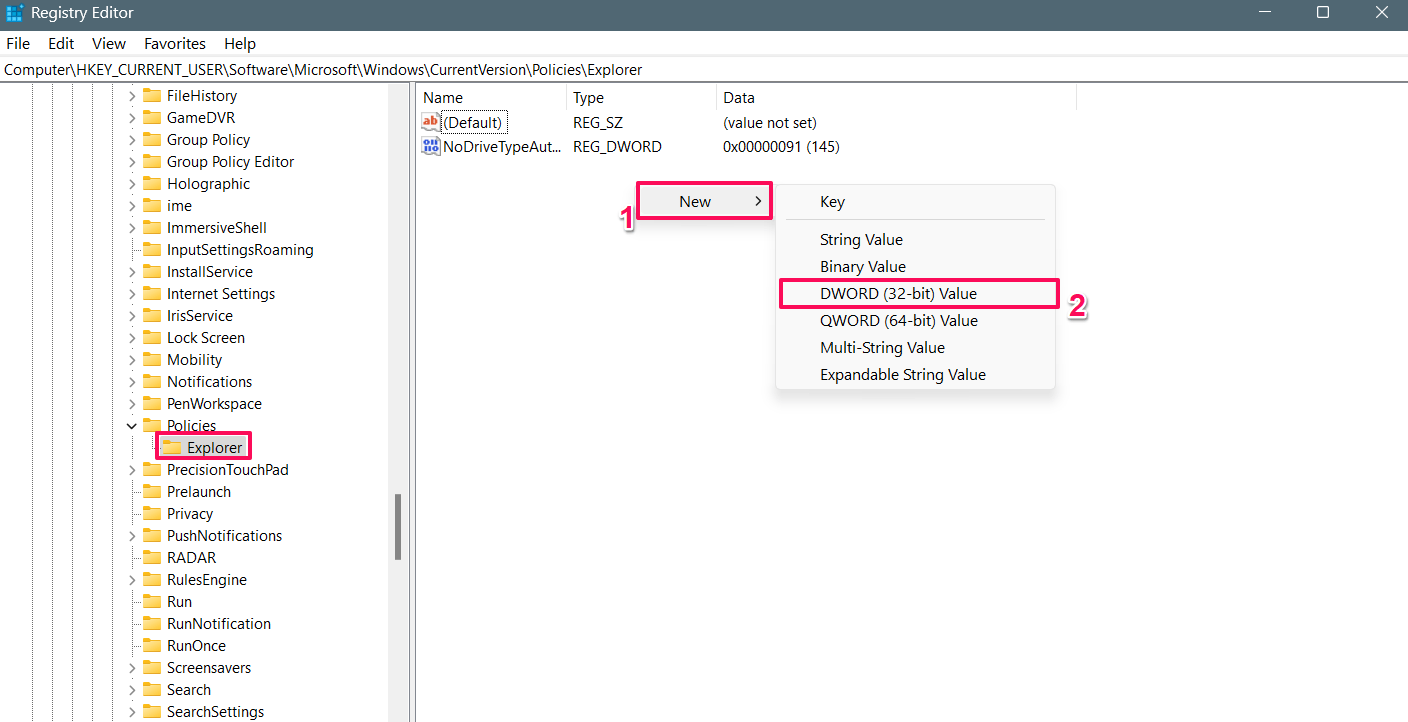
- Right-click on the Explorer key and select New, then choose “DWORD (32-bit) Value.”

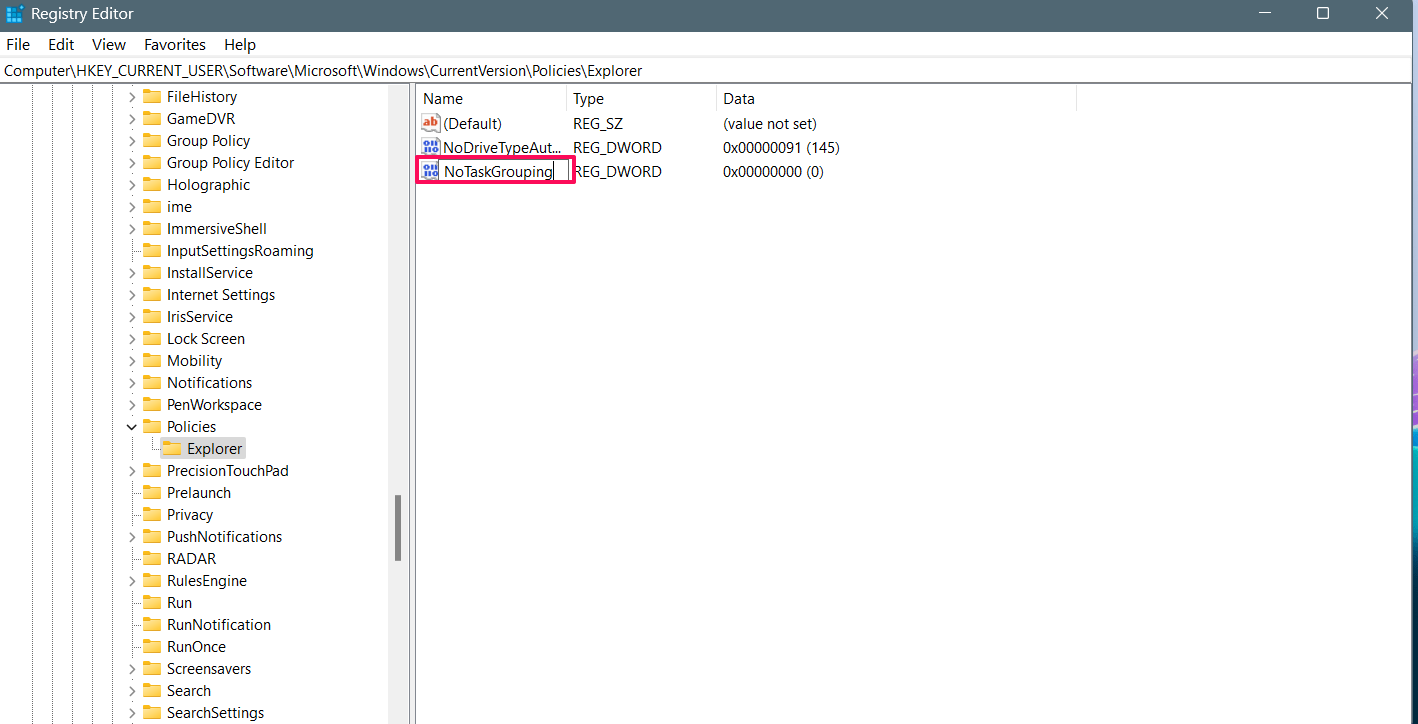
- Double-click on the newly created DWORD value, type “NoTaskGrouping”, and press Enter.

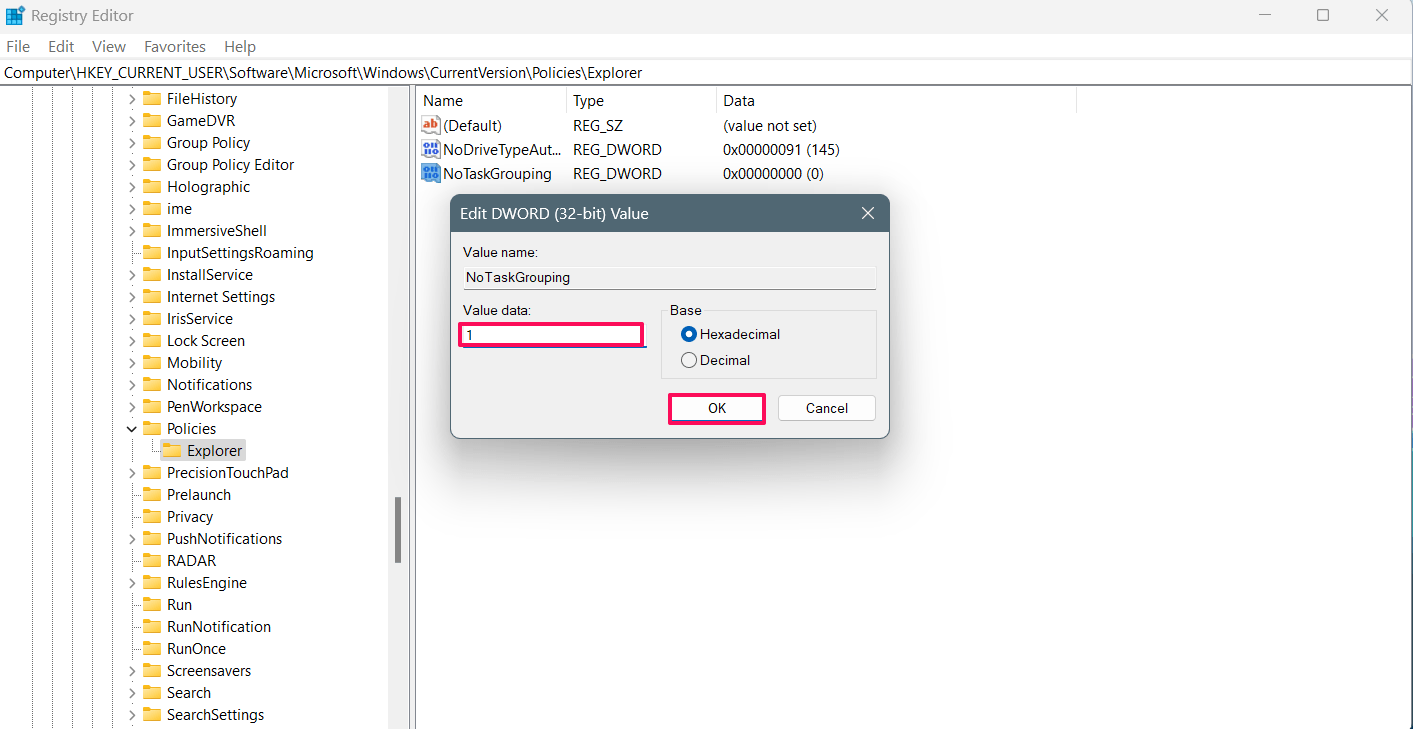
- Next, double-click the new value, type 1 in the Value Data field, and click OK.

- Finally, restart your computer to apply the changes.
You should now see that the taskbar icons are ungrouped and expanded.
3. Never Combine Taskbar Buttons Using Group Policy
You can tailor your Windows settings, inclusive of the taskbar, by employing the Local Group Policy Editor. However, the Local Group Policy Editor is only accessible for Enterprise and Windows 11 Pro editions. Hence, if you are using Windows 11 Home Edition, this method may not be applicable.
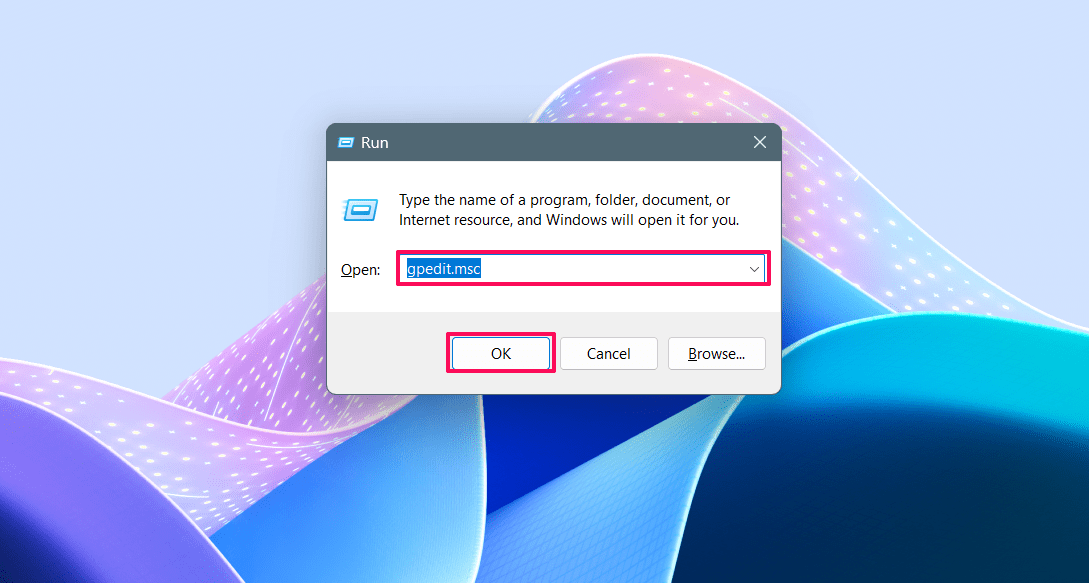
- Press the Windows + R key simultaneously on the keyboard to open the Run dialog box.
- Enter “gpedit.msc” in the field section and click OK to launch the Local Group Policy Editor window.

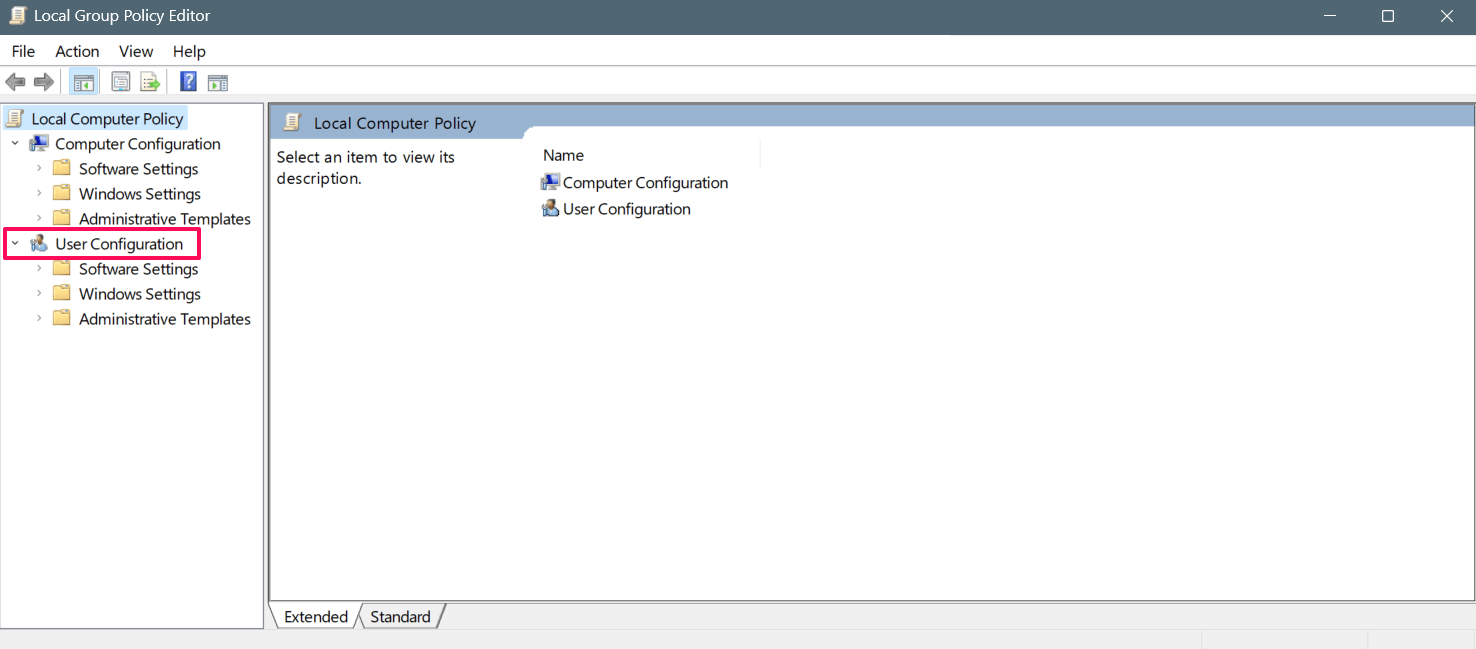
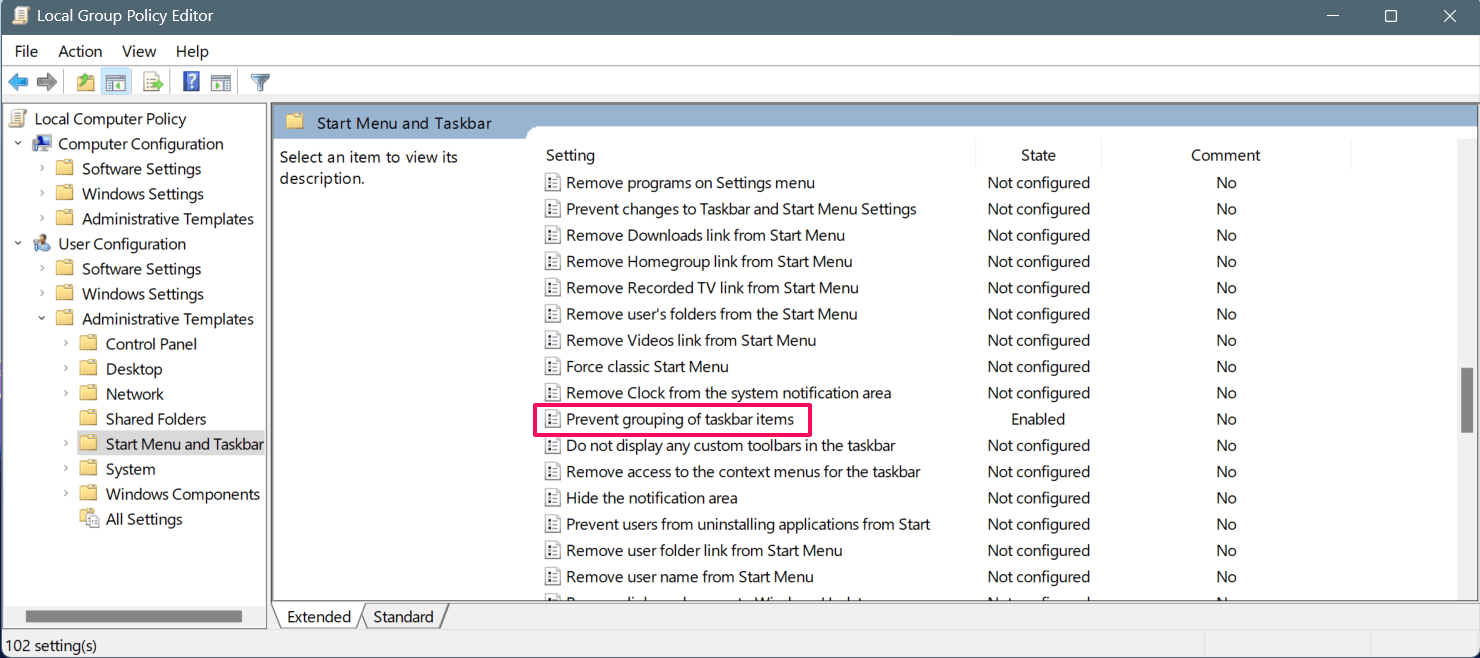
- On the left pane, double-click on “User Configuration” under the Local Computer Policy.

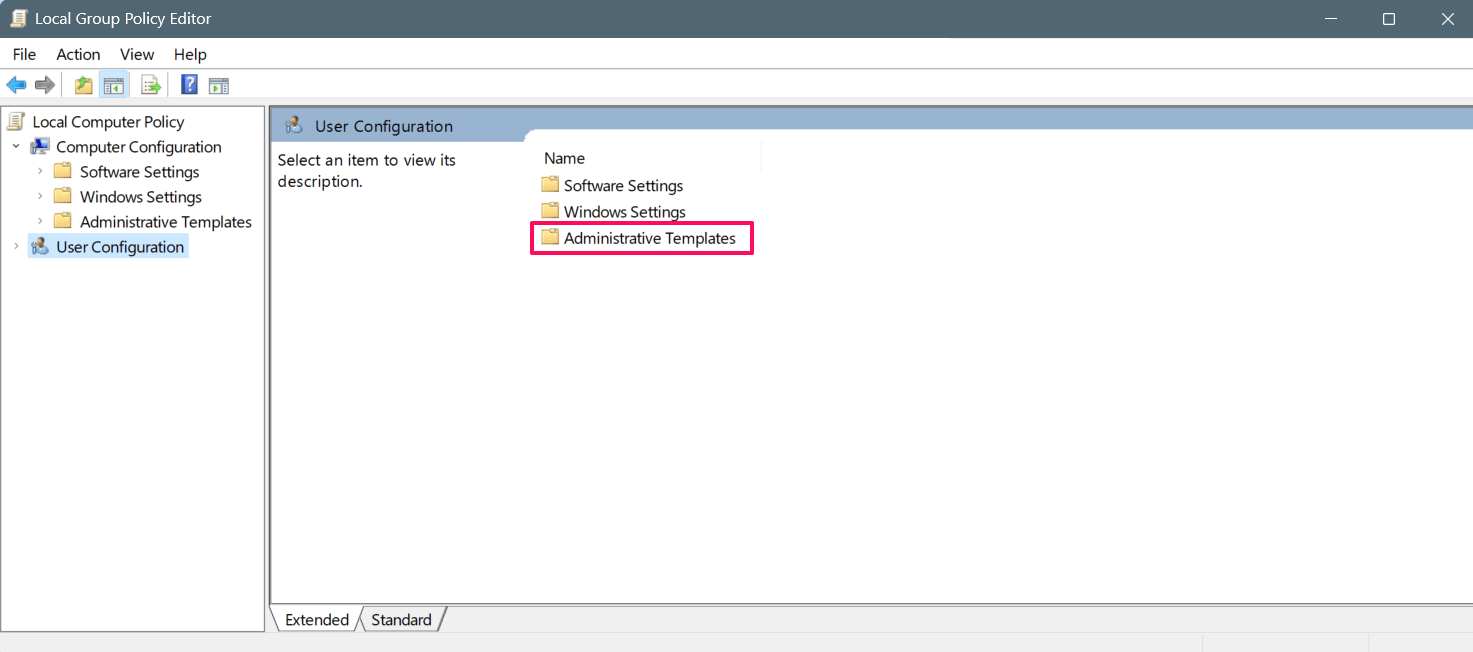
- Next, double-click on “Administrative Templates.”

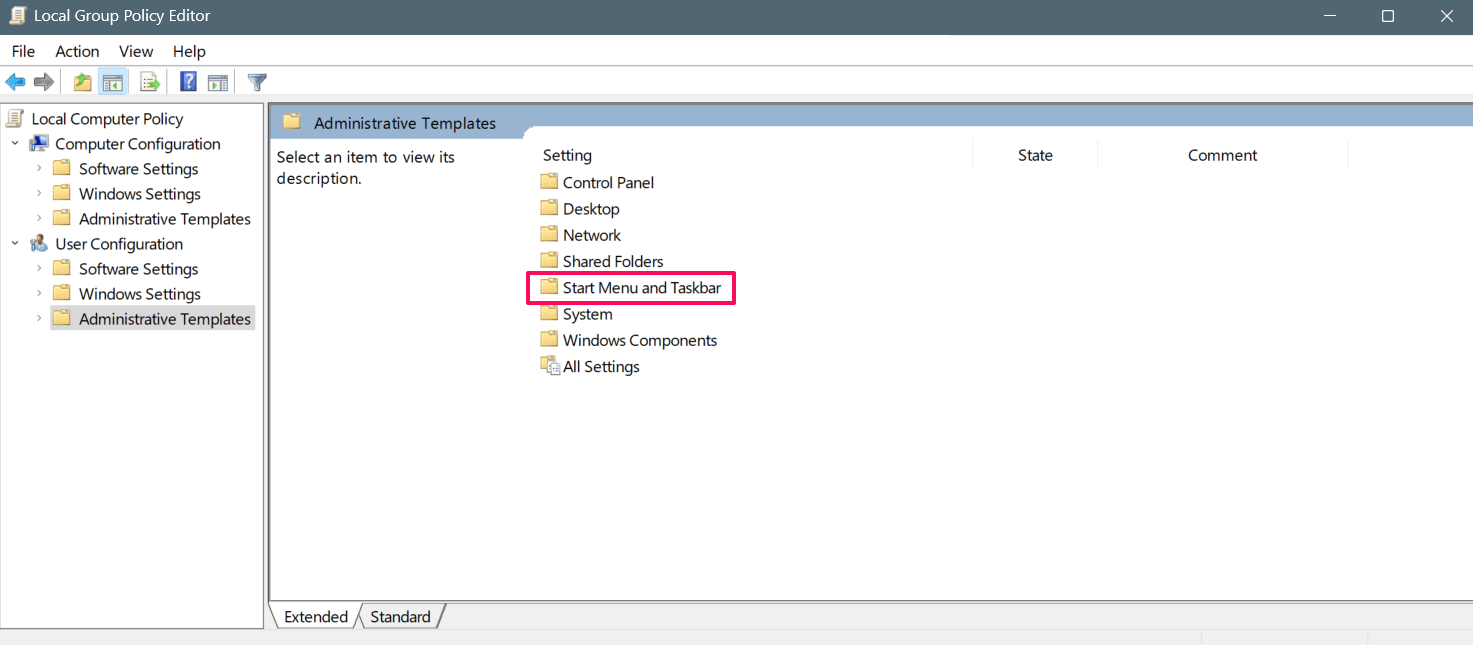
- In the settings group, double-click on the “Start Menu and Taskbar” option.

- Under the Start Menu and Taskbar settings, double-click on “Prevent grouping of taskbar items.”

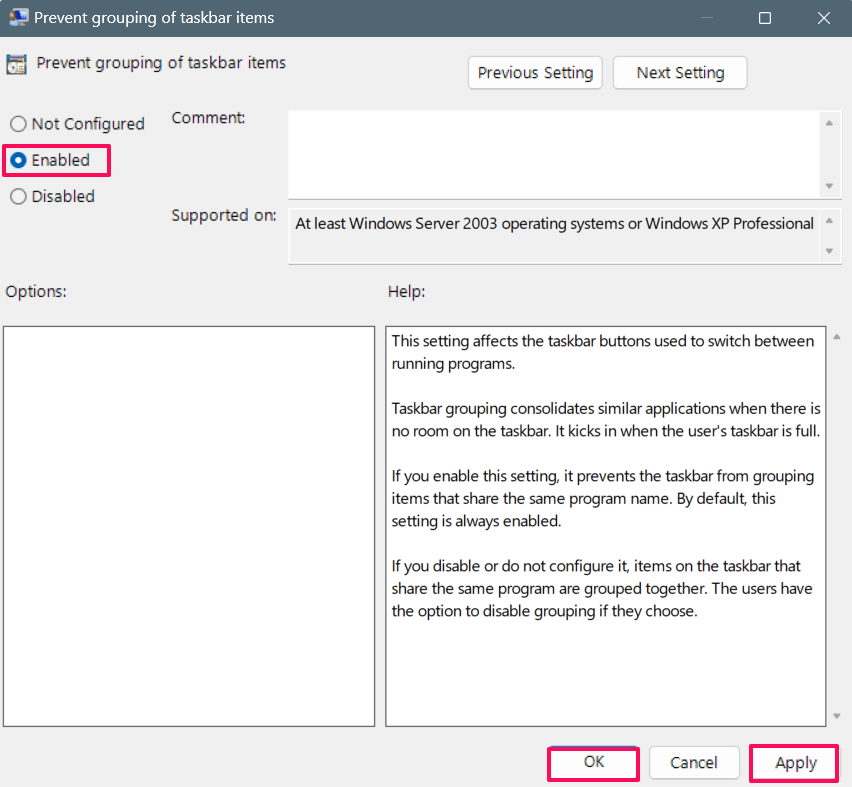
- In the pop-up window, select the Enabled option.
- Finally, click on the Apply button followed by OK to effectuate the changes.

You have now successfully ungrouped the taskbar icons on your computer. If you wish to revert the changes, select Disabled by following the same procedure, and the taskbar icons will return to their original state.
4. Ungroup Taskbar Icons Using a Third-Party App
Several third-party applications can help ungroup taskbar items in Windows. One such tool is StartAllBack. This application allows you to quickly customize your taskbar and other settings such as the start menu and Explorer.
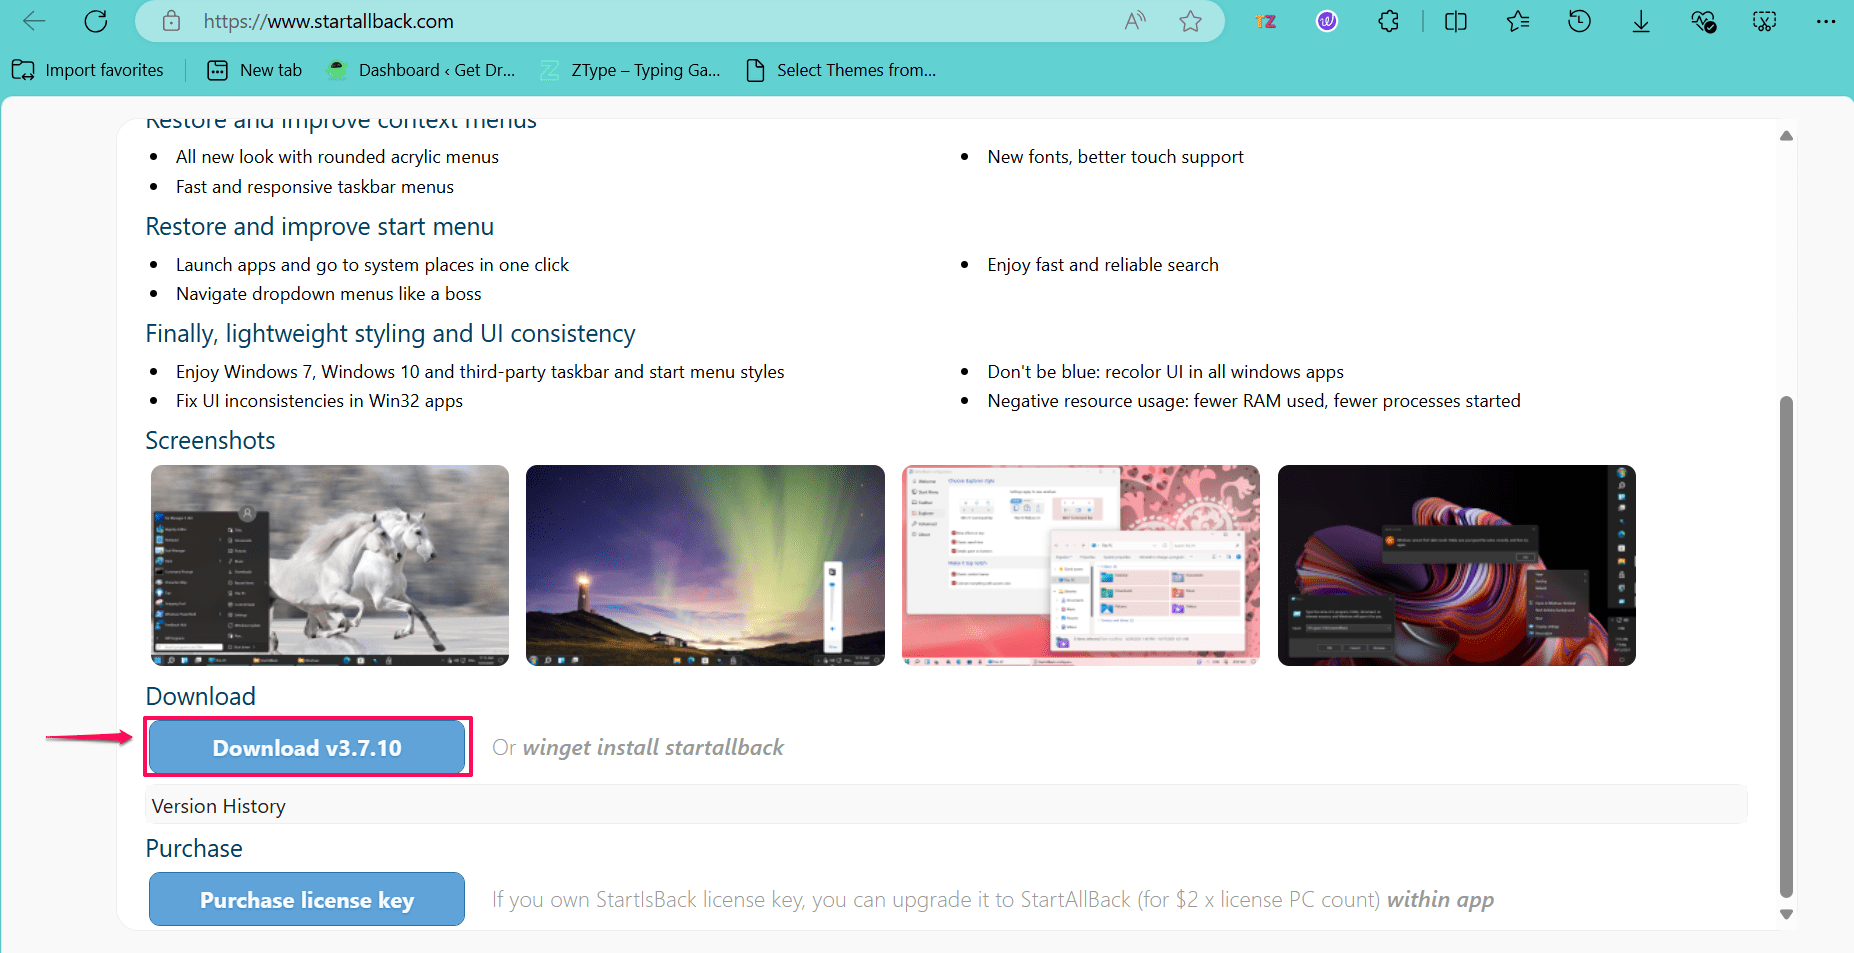
- Using your computer browser, navigate to the StartAllBack website.
- Click on the Download button on the left side to install it.

- Once the file is downloaded, double-click on the setup file to run it.
- Select the installation option: “Install for me” or “Install for everyone.”
- After making your selection, the app will be automatically installed on your PC. You may notice some changes in the taskbar.
- If no changes are apparent, press the Windows key on the keyboard, type StartAllBack, and click Open.
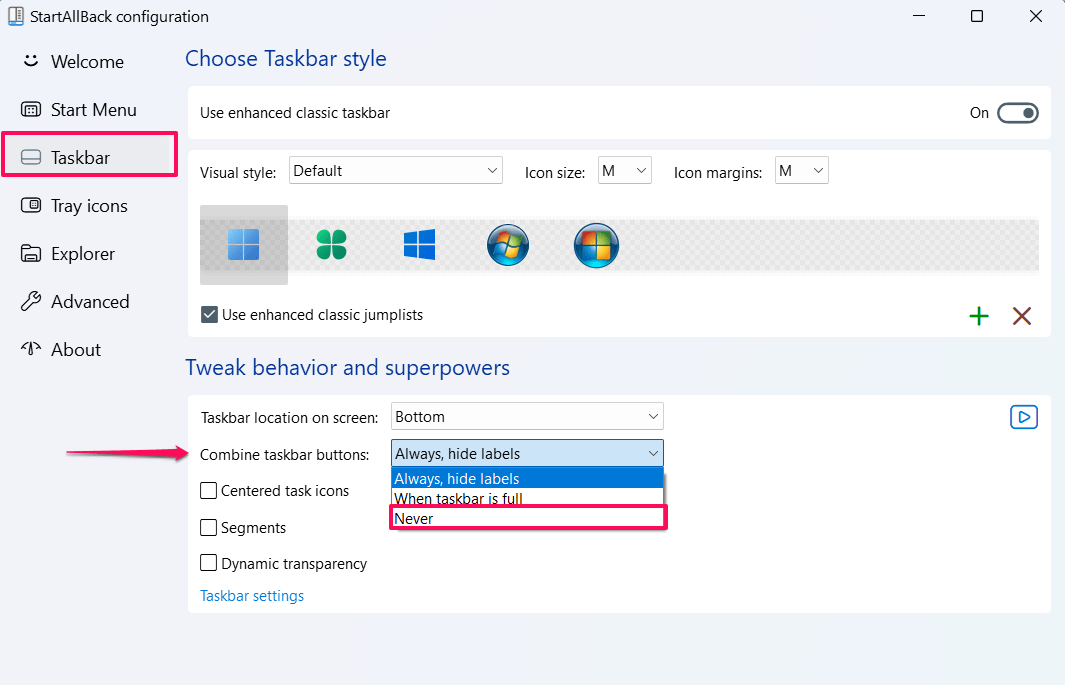
- Select the Taskbar menu from the left sidebar.
- In the “Tweak behavior and superpowers” section, click the drop-down menu next to “Combine taskbar buttons” and choose “Never.”

You should now observe changes in your taskbar. The taskbar at the bottom should display icons individually with labels of grouped icons. Additionally, you can also customize the taskbar for multiple displays.
Frequently Asked Questions
Can I ungroup specific app icons and keep others grouped?
Unfortunately, you cannot ungroup specific app icons on a Windows computer while keeping others grouped. No built-in feature allows individual icon ungrouping.
Why is the option to Ungroup taskbar icons not visible?
If the option to ungroup taskbar icons is not visible in your Windows settings, it is likely because you are using an older version of the Windows operating system. Older versions do not have this feature.
Will ungrouping taskbar icons affect my system’s performance?
Ungrouping the icons on the taskbar may have a minor impact on system performance.
Final Thoughts
This concludes our guide on how to ungroup taskbar icons on Windows 11. We have provided four different methods to ungroup taskbar icons on a Windows PC. By using any of these methods, you can easily ungroup the taskbar icons. We hope you found this guide helpful!
If you have any thoughts on How to Ungroup Taskbar Icons on Windows 11, feel free to share in the comment box.

